How to Turn Off Memory Integrity in Windows 11 | Disable Virtualization Based Security (HVCI)
Now… If you’re researching for the How to Turn Off Memory Integrity in Windows 11 | Disable Virtualization Based Security (HVCI) video, then you’ve discovered it. Here’s why – because in this DIY video guide, you’ll learn secrets from the best DIY PC tech who can teach you how it’s done…
How to Turn Off Memory Integrity in Windows 11 | Disable Virtualization Based Security (HVCI)
How to Disable Memory Integrity in Windows 11, Hypervisor-protected code integrity (HVCI).
1. Open Windows Security by clicking the shield in the lower-right corner.
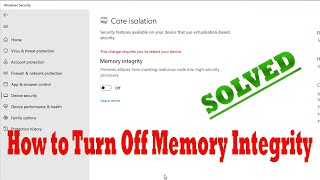
2. Click on Device security.
3. Click on Core isolation details
4. On the Core isolation page, turn off the toggle for Memory Integrity. You might need to restart your device.
How to Fix Memory integrity can’t be turned off in Windows 11 | Unable to Turn off the memory integrity option from windows security – automatically turn on after system restart.
Solution:
Create a system restore point.
Go to bios, and disable secure boot.
Log into windows, turn off memory integrity, enable secure boot, and log into windows.
Recheck your issue.
If you found this guide helpful, please share the How to Turn Off Memory Integrity in Windows 11 | Disable Virtualization Based Security (HVCI) video on Pinterest…
Recommended reading
You can watch these related how to Windows memory tutorials…
About The Author
WindowsMD
Our how-to website is dedicated to helping you solve common Windows desktop computer problems. On every page, there is a helpful video tutorial that guides you with easy to follow step by step instructions.